15 Tips to Increase Pinterest Traffic to Your Blog Today
Pinterest traffic can be a great source of visitors to your blog, provided you put effort into making the Pinterest platform work for you.
If you’re like most bloggers, you know that getting traffic to your website is one of your top priorities. But, getting traffic to your site is not always easy.
In this article, I’m going to help you by sharing fifteen different tips and techniques for driving Pinterest traffic to your blog.
Each of these methods are useful for driving free organic traffic to your site from Pinterest.
Pinterest Traffic Tips
You may find it helpful to follow each of these Pinterest traffic tips in a step-by-step fashion.
1. Claim Your Website
One of the first things you should do after creating a business account for your Pinterest profile is to claim your website.
Related: 7 Reasons Bloggers Should use Pinterest for Business
The benefit of doing this is that your profile picture will appear next to your pins along with a clickable link that goes directly to your full Pinterest profile.
See tip #2 below for an example of what this looks like.
When people visit your profile on Pinterest, they’ll be inclined to click around on more of your pins, which will lead to more clicks and traffic to your website.
Another benefit of claiming your website on Pinterest is that you’ll be able to see your Pinterest Analytics.
By looking at your analytics, you’ll be able to see which pins drive the most traffic to your site.
By knowing which pins drive the most traffic to your site, you can tailor your future pin designs and descriptions to be similar to your other successful pins.
That, in turn, should drive more traffic to your site.
To claim your website on Pinterest, you’ll need to either upload a small file to your site or add a meta tag. Both of those are provided by Pinterest and you can learn more about this in their help article on how to claim a website on Pinterest.
2. Setup Rich Pins
When you setup Rich Pins in Pinterest, your pins will pull the meta-description from your blog post and display that information in your pin.
If you’ve created a compelling meta-description for your post, your pin will be more likely to entice someone to click through to your website.
Understand that you also will be entering your pin description separately, thereby giving you a second place to write compelling copy to entice a reader to click through to your blog post.
Example:
Here is the text from my “Mindset Shifts” Rich Pin with the meta-description pulled from my blog post:
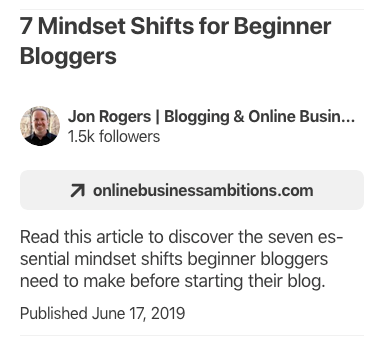
Note my Pinterest profile picture and profile name above. This comes from claiming my website (see tip #1 above).
At the time of writing this post, Pinterest offers three different types of Rich Pins: Article, Recipe and Product.
To get Rich Pins, you’ll need to apply for them and run their validation tool. You can learn more about that by reading their Rich Pins help article.
3. Make Your Blog Posts Shareable to Pinterest
If you include a pin image inside your blog post, you should encourage your reader to share your pin to Pinterest.
When someone shares your pin to Pinterest, that gives your pin a chance to be shared again and again on the platform.
It’s also a signal to Pinterest that your pin is getting engagement.
All of this should lead to more traffic back to your website when people click on that pin in Pinterest.
To make your pin shareable, you’ll need to include some code from Pinterest inside your post to make a Pinterest “Save” button appear when someone hovers over your pin image.
You can learn more about how to do that from Pinterest in their Save Button help article.
As an alternative, some of the popular social sharing plugins have similar functionality built in to share your pins to Pinterest.
Social Warfare and Social Pug are two examples of plugins that do this.
Pinterest Pin
4. Use Keywords in Your Board Titles and Descriptions
Including keywords in your board titles and descriptions is important for telling Pinterest what those boards are about.
It also helps Pinterest understand the context of the pins inside those boards.
So be sure the pins inside your boards are congruent with the boards they’re in!
By having good keywords, you’ll be more likely to have your boards and pins appear in search, when someone types a search term (i.e. keyword) in the top search bar on Pinterest:
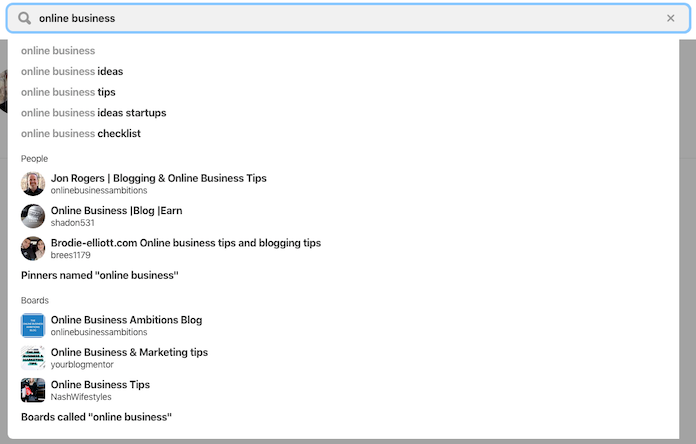
And of course, if your boards and pins come up, that should lead to more clicks and traffic back to your website.
5. Stick to a 2:3 Pin Ratio
In order for someone to see your pin, Pinterest needs to display it on the platform. Obvious, right?
Well, if you don’t follow Pinterest’s guidelines for your pin images, your pin might not get displayed.
In both the Pinterest Build a Pin and Promoted Pins help articles, they specifically mention creating your pin with a 2:3 ratio.
They even get specific and say a 1000 by 1500 pixels pin is suggested for Promoted Pins.
Given the above, it makes sense to follow their guidelines to give your pins the best chance of being seen.
And finally, they even go on to say “Pins that exceed a 2:4.2 width-height ratio will be truncated in people’s feeds.”
So, if you want to get Pinterest traffic back to your website, it’s in your best interest to stick to the 2:3 ratio they suggest.
I’ve found that a 600 by 900 pixels image works well for my current website theme.
In late 2019, Pinterest mentioned that for the best image quality, use 1000 by 1500 pixels, similar to what they previously recommended for Promoted Pins.
Those bigger images get shrunk down on mobile devices, but because the original size is 1000 by 1500 pixels, the quality should remain high when they get shrunk down to the smaller size.
6. Use Attractive Images
The first thing that will draw someone’s eye to your pin is the visual itself.
I think it’s safe to say that most people are more drawn to attractive images versus non-attractive images. That’s just the way we are as humans.
So, given that, in order to attract someone’s eyeball you want your images to be clear, bright and attractive. Stay away from images that are dull or darkly lit.
If your image includes a person, keep in mind that someone viewing the pin might be picturing themselves as that person in the pin.
Perhaps they’re feeling similar feelings as the person in the picture or maybe they’re picturing themselves doing what the person in your picture is doing. Keep that in mind when choosing images for your pin.
Also, be sure the image is congruent to the blog post.
For example, if your blog post is about a pumpkin recipe, it makes sense to show a pumpkin or the results of the recipe itself as the picture. A general picture of a set dining room table might not convey the same meaning, even though food and dining is the general topic.
This is important because you don’t want people to be confused by your pictures and ultimately ignore further pins from you.
In the end, attractive and congruent images should lead to more clicks.
7. Check Image Similarity
On the subject of images, Pinterest will compare your pin’s image to the images on your actual blog post.
They’re looking for similarity between the two.
Specifically, Pinterest calls it an “image cohesion signal that detects image similarity between onsite and offsite images” as mentioned in their Building Pin Cohesion post on Medium.
This means that if you have similarity between the two, that will signal to Pinterest that, Yes, the Pin and the blog post are congruent and your pin should be shown on Pinterest.
And the more likely your pin is shown, the more likely you’ll get traffic to your blog post from that pin.
8. Have a Clear Text Overlay
Pinterest is able to read the text overlay you put on your pin.
That’s important because it’s a further signal as to what your pin is about.
So, be sure that the words you put on your pin convey what your pin is about. And ultimately what your blog post is about.
That, along with tip #4 above, will help get your pin to show up in search. Which in turn, should lead to more clicks.
Also, when someone is looking at your pin, you want them to quickly understand what they’re going to get when they click on your pin to get to your post.
So, be sure to use fonts that are easily readable and make your text nice and big so it’s easily read on a smaller, mobile device.
9. Use Keywords in Your Pin Descriptions
When you’re writing up the description for your pin, be sure to use relevant keywords in the description itself.
Much like what’s been stated above, it’s another to signal to Pinterest as to what your pin is about.
And beyond just showing your pin in search, a well keyworded description may also help get your pin to show up in people’s home feeds.
That’s because Pinterest will show recommendations based on what they think people’s interests are in their home feed.
If a person’s interest matches your keyword, your pin is more likely to show up in their feed.
10. Have Matching Meta-Description Keywords
Try to ensure the keywords in your meta-descriptions and pin descriptions are the same.
Remember, you’re trying to build a picture for Pinterest so that they can properly categorize your pin and show it to the most relevant users.
By matching the meta-description keywords to the pin description keywords, you’ll be further building that connection.
11. Use Hashtags
For a long time, Pinterest didn’t want you to use hashtags.
More recently, they now suggest using hashtags for phrases or words so that a pin can be further identified as to what it’s about.
The hashtags themselves should be put inside the pin description.
Personally, I find this to be similar to tip #9 above, in that you should use hashtags as keywords. I like to keep it to 1-3 hashtags per post so your pin doesn’t look spammy.
What’s great about them is that they’re both clickable and searchable.
What that means is that if someone is searching for a particular topic and they search on a hashtag that matches one of yours, there’s a chance that yours will show up.
The caveat though, is that it’s most recent first. So, if you’ve recently posted a pin with that hashtag, it will appear near the top.
If it’s been awhile since that pin was posted, it will be further down.
All in all, another way to get visibility to your pins and drive Pinterest traffic to your site.
Update: Pinterest is again saying that hashtags are optional which means more emphasis should be put on keywords in your pin descriptions. Also, Pinterest is now really pushing the idea of “fresh pins” over anything else. That means creating new pins with never-seen-before images (and creating new Pins often).
Bonus Pinterest Traffic Tip
If you use Tailwind to automate your Pinterest pinning, use their Smart Schedule feature.
That will allow you to pin your hashtagged pin at the specific time when there’s the most people on Pinterest who engage with your content and might be searching your hashtag.
Who knows… Your pin might be the first one they see and click on!
12. Compel Your Viewer to Click
It’s important that the combination of your image, description, title and hashtag all work together to compel your viewer to click on your pin and go to your blog post.
While this may be more art than science, a good piece of advice is to have a call to action with your pin.
That could be in the text overlay, the description or the meta-description.
For example, if you look back up at tip #2, you’ll see the following text in my pin’s meta-description:
“Read this article to discover the seven essential mindset shifts beginner bloggers need to make before starting their blog.”
The words “Read this article” (plus the rest of the text) work together as the call to action to compel the viewer to click through to the blog post.
13. Pin to Your Most Relevant Board First
In order for Pinterest to properly categorize and distribute your pin, you should save your pin to the most relevant board the first time you save that pin.
After that, it’s OK to save your pin to multiple boards, but keep it to ten or less.
As a matter of fact, that’s a good strategy because someone may not be following all of your boards (just some).
By pinning to multiple boards that are still relevant, you have more of a chance of that particular follower seeing your pin.
But, be sure to start with your most relevant board first, to properly signal to Pinterest what your pin is all about.
Also, be sure to space out your pinning to multiple boards. Once every seven days, for example.
14. Create More Than One Pin per Post
Pinterest likes fresh content.
When you create a second, third, fourth (etc.) pin for the same blog post, Pinterest will consider it fresh as long as there’s a new image for each pin. You should also change up the description a bit.
So, by creating new, fresh pins, you’ll be more likely to have multiple pins being distributed that all lead back to the same blog post.
To take this one step further, when you have different images, you’re also more likely to appeal to a wider group of people.
That’s because not everyone will be drawn to the same image. However, by having different images, you’ll be more likely to catch the attention of more people.
Keeping both points in mind with this tip, multiple pins means multiple chances of bringing traffic back to your blog post.
15. Keep Time of Year in Mind
Many people who’ve been on the platform for a few years notice the occurrence of a “summer slump” where their traffic from Pinterest drops during the summer months of the northern hemisphere.
This, of course, depends on the niche that you’re in.
Given that, it’s important to keep the time of year in mind when you’re pinning your pins.
You may want to consider focusing your efforts during the fall and winter months. That’s when traffic from Pinterest picks up. Kids are back to school, vacations are over and people are indoors and back to their normal routines. It’s natural that traffic would pick up at that time.
Another thing to consider is the holidays. That’s a great time of year to target people who are using Pinterest for search and discovery of holiday gift ideas and food and decor items.
These are big niches in the blogging world and focusing your pinning efforts during those times makes sense if you’re in those niches.
Conclusion
I hope you enjoyed this post! If you’ve jumped down to the bottom and want the TLDR version, here it is…
Tips to increase Pinterest traffic to your website:
- Claim your website.
- Setup Rich Pins.
- Make your blog posts shareable to Pinterest.
- Use keywords in your board titles and descriptions.
- Stick to a 2:3 Pin ratio.
- Use attractive images.
- Check image similarity.
- Have a clear text overlay.
- Use keywords in your Pin descriptions.
- Have matching meta-description keywords.
- Use hashtags.
- Compel your viewer to click.
- Pin to your most relevant board first.
- Create more than one Pin per post.
- Keep time of year in mind.
I’d love to hear your thoughts on this! Do you agree? Anything else?
Please share in the comments below…


I really needed such advice. I have been struggling with getting blog traffic from pinterest. Thank you for these tips. They are quite clear.
Glad you found it helpful, Marion!
Great style blog you have, by the way. Very classy!
Cheers!
Jon