How to Start a Tailwind Community Step by Step

If you’d like to learn how to start a Tailwind Community you’ve come to the right place!
In this blog post, you’ll be getting a step by step process for starting a new Tailwind Community.
We’ll start off with the important decisions you need to make before starting your community.
Then we’ll move on to the actual steps you need to take, inside Tailwind, to create your very own Tailwind Community.
And by the way, if you blog about online business, I’d love to have you join my Ambitious Bloggers community.
Now, we won’t be covering ongoing community maintenance in this post. The goal here is to keep it simple and just get you started.
Note: In 2021 Tailwind changed the name from Tribes to Communities in an effort to be more sensitive to certain populations. You may see some mention of Tribes in this post, but know that the name has changed.
How to Start Your Own Tailwind Community
This post contains affiliate links, which means I will make a commission at no extra cost to you should you click through and make a purchase. I only recommend products that I believe will provide great value for my readers.
In order to start your own Tailwind Community, you need to have Tailwind.
Tailwind is a tool that lets you automate the scheduling of your Pinterest pins and also gives you access to Tailwind Communities. They’re an approved Pinterest partner and the tool I use for scheduling my Pinterest pins. I love ’em!
What is a Tailwind Tribe
If you don’t already know what a Tailwind Community is, let me give you an explanation…
A Tailwind Community is a group of people inside the Tailwind app that have formed to contribute and share Pinterest pins.
Once you join a Tailwind Community, people will share the pins you add to the community with their followers on Pinterest.
You’re also required to share their pins as well.
This, in turn, can lead to more engagement on Pinterest and more traffic to your website from your pins being shared.
Related: 15 Tips to Increase Pinterest Traffic to Your Blog
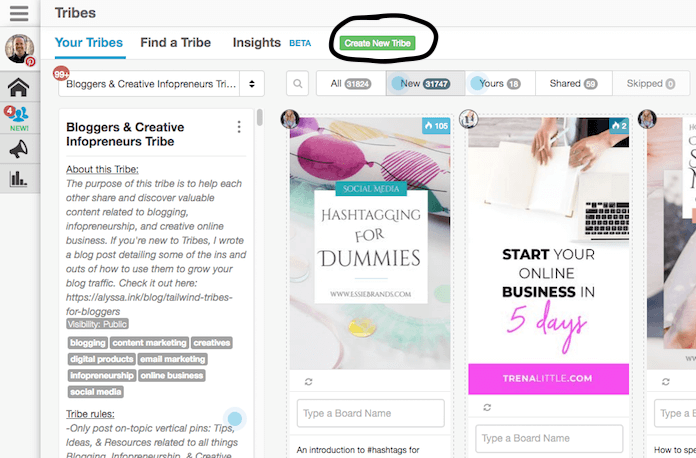
What a Tailwind Community Looks Like
Below you’ll see a picture of what a Tailwind Community looks like inside the Tailwind app. Plus, a few of my own Pinterest pins inside the Community.
You’ll notice that this community has 2,200 members inside of it with over 149,000 Pinterest pin shares from these members.
For just myself, you’ll see that in this community my pins have received 59 re-shares and 12 repins, giving me a total reach of 157,200 people who have seen my pins on Pinterest.
And that’s just from this tribe alone. By now, you should be starting to see the power of Tailwind Communities!

Getting Used to Tailwind Communities
Now, before you start your own community, it’s a good idea to join other communities as a member first.
Spend some time getting used to how things work in communities. By doing so, you’ll be better prepared to lead your own community.
Decisions to Make Before Creating a Tailwind Community
Before you create your Tailwind Community, there are some important decisions you need to make.
Below we’ll cover each of the decisions, plus you’ll get information to help you make those decisions.
1. Choosing your Tailwind Community’s topic.
The first decision is to choose what your community is going to be about (i.e. its topic).
If you choose a broad topic, you’ll likely attract more members.
However, you’ll also end up with a wider variety of pins related to your topic and that may not appeal to everyone in the community.
In other words, some members will relate to SOME of the pins, but all members won’t relate to ALL of the pins.
Make sense?
If you niche down, you’ll attract less people but the community’s content will be more focused. This can lead to more engagement.
There’s also the wildcard of how popular a topic is.
For example, I recently joined Tailwind for my Honest Wine Reviews blog. I found that there weren’t very many wine bloggers in Tailwind. So, in a case like that, a broad topic would be OK.
Compare that to online business and Internet marketing. There’s a HUGE number of us in Tailwind. In a case like that, narrowing down is probably a better idea, though not required.
So, give it some thought and decide how narrow or broad you want your topic to be.
Then go ahead and choose your topic.
2. Naming your Community.
The name you choose for your Tailwind Community is up to you.
I’d suggest something with a little inspiration in it, that garners some attention and emotion.
Also, be sure the name relates to the topic you’ve chosen.
Here’s some examples of a few existing community names that I think are pretty cool:
- Bloggers & Creative Infopreneurs.
- Internet Marketing Super Friends.
- Bloggers Killin it on Pinterest.
- Bloggers Camp.
- Ambitious Bloggers (mine!).
If you can, try to come up with something unique, but still conveys what your community will be about.
3. Your Community’s Description.
You can also think of this as your community’s About section.
You’ll need to decide the purpose of the community, who it’s for and any other information that is important for people to know.
I’d suggest looking at communities you’re already in to get some good ideas on what to put in this section.
Take a look at their “About” description to see what they entered.
4. Community Rules.
You get to set the rules for your community and can kick people out if they don’t follow them.
Typical rules that I’ve seen include:
- The pin share to contribute ratio. i.e. How many pins from other community members you must share to your Pinterest boards vs. How many pins of yours you can add to the community. Often the ratio is 1:1 or 2:1.
- The layout of the pins you contribute. Usually, vertical pins (e.g. 600×900) are preferred.
- Whether or not duplicate pins are allowed from a member.
- What the topic of the pin must be about. (No one wants off-topic pins in their community)
And more… I’d suggest looking at the communities you’re already in or using the Find feature in Tailwind and see what rules are common.
5. Community Visibility.
When you create your Tailwind Community, you get to choose how others can join.
There are three different levels of visibility:
- Public
- Request to Join
- Secret
Let’s cover each one…
Public:
With this choice, anyone can join your community without you (or one of your community’s admins) having to approve them.
This choice is good if you want to build your community fast. However, you’ll need to closely monitor who is joining so that you don’t end up with members who aren’t a good fit.
Request to Join:
This choice requires you to approve new members who request to join. It’s the recommended choice by Tailwind and gives you greater control of who can join your community.
Secret:
Whereas the two choices above result in your community showing up in search, a secret community does not. If you want to have a private community, where you pick and choose the members, this may be the choice for you.
6. Initial Content.
Before you create your community, you should give some thought to the initial content you’ll be putting into it.
The content should be directly related to the Community’s topic, obviously.
After you start your community, you’ll be inviting others to join. With that in mind, consider adding pins from Pinterest that have been posted by the members you’ll be inviting.
By doing this, you’ll be seeding your new community with great content and giving a warm welcome to the new members you invite. They’ll be happy to see that their pins meant enough to you to post them to the community ahead of time.
And of course, don’t forget to post several of your own pins as well. It’s your community after all!
7. Initial Members.
The last thing to think about before creating your new community, is who you want in it to start.
Put together a list of several Tailwind users you already like and trust, who post pins that are on-topic with your new community and send them invites.
Consider members of other communities you’re already in, that you know would be a good fit.
You can also reach out in other ways, too. For example, reach out on your social media channels with a post saying you’ve started a new community.
Or, send a broadcast out to your email list, asking any Tailwind users to join.
I’ve also seen people use the chat feature inside Tailwind to spread the word.
Lastly, you could write a blog post about Tailwind Communities and talk about your community inside the post, letting people know you’re welcoming new members.
How to Start a New Community Inside Tailwind (Step by Step)
With the above decisions made, you’re ready to go into Tailwind and setup your brand-new Tailwind Community!
Here’s what you do…
1. Find the “Create New” Button.
In Tailwind, head to the communities section and look for the button that allows you to create a new one.
Go ahead and click on it, to bring you to the next step.
2. Create the Community.
Next, you’ll be shown the screen below to enter information about your new community.
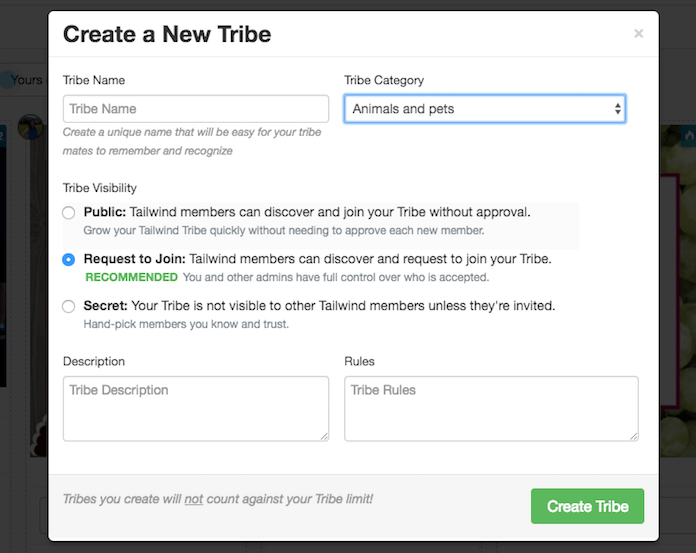
This is where you’ll enter the name, the category it belongs to (from a dropdown list) and its visibility level.
You’ll also enter in that description we talked about above and the rules of your tribe.
Once done entering the information, just click on the Create button and it will be created.
Simple!
3. Add Tags.
After you create your community, you’ll immediately get the ability to create tags about it.
You’ll see a button that says “Add tags.” Just click on it and then enter a few tags that relate to your topic.
For example, if you were creating a community for wine bloggers, you’d add a tag called “wine.”
4. Add Content and Invite Members.
Now that your tribe has been created, you’re off to the races!
Go ahead and add some pins (yours and others) and start inviting new members.
Conclusion
That’s really all you have to do to start a Tailwind Community.
Tailwind makes the process very simple and fast.
To wrap things up, here’s what you learned…
You start by making a few decisions about the community you’re going to create:
- Topic.
- Name.
- Description.
- Rules.
- Visibility.
- Initial Content.
- Initial Members.
Then you go through the simple steps to start it:
- Find and click the “Create New” button.
- Enter in the information about your community and click the Create button.
- Add tags relevant to your new community.
- Add pins and invite members to join.
That’s all there is to it.
I hope you found this blog post useful!
Are you going to start a Tailwind community? Let me know by leaving a comment below.